Colorised Avatars For Dummys
A tutorial in Creation by Ankh
|
Avatars are the cute pictures we wear in Palace to represent us. While there are quite literally THOUSANDS of avatars currently available covering everything from famous people to household appliances, some people prefer to make their own. At the very least a lot of people have an avatar of *the real person* made of a photograph. Making an avatar is no big mystery.
The process is actually quite simple. You do need a couple things. First is a *graphics program* . This is a piece of software that runs on your computer. The most common is one called Paint Shop Pro (which you can get from www.jasc.com for a trial), although I use Adobe Photoshop for most of the work. The second thing you actually need is the *Palace Palette*, which (hopefully) is available HERE at Palace Planet. The Palace Palette is a *list* for your software of all the colors that Palace allows (there are something over 250 colors allowed). Although some people SWEAR you don't need to do this (apply the palette) I myself find that doing it first allows you to make small adjustments. The Palace Program will do it anyway, so better to be warned than surprised I say. For PAINT SHOP PRO you need the file Palace.pal, and for ADOBE PHOTOSHOP you need the file Palacecolors.act.
IN THIS TUTORIAL I am mostly using Adobe Photoshop, with Paint Shop Pro (PSP) listed after in parenthesis. All commands are listed as FILE>SAVE (FILE>SAVE). This means go to the FILE menu and find SAVE under it, and the commands are the same in PSP (in this case, not always). |
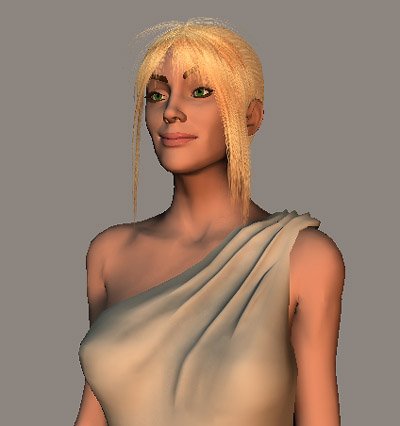
The first step in making an avatar (or *av* from now on, okay?) is to get yourself and original. This can be any picture of you, or your dog, or anything really. You can make any picture into an av. A lot of people steal them off the web or scan them out of magazines. I am not sure you should do that, but use your judgement. This picture was made in Poser, a program that makes umm... people. Right click and copy it if you want to follow along this tutorial. That's right, this is interactive. I believe learning should be hands on. I made this and I give you my permission to copy it for personal use. *laffin* I made her less than wonderful so I wouldn't have to see her in every palace I go to, but feel free to wear her to death if you want. Unless your a guy. That's another story. |
STEP 1
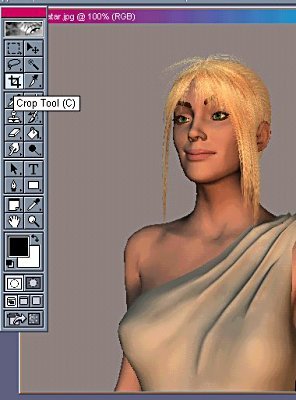
The first thing we are going to do is *crop* our picture so all the unwanted stuff is gone, and just the figure is left. We are VERY limited in the size of our av, so getting rid of the unwanted stuff is VERY important. I am using Photoshop, but in Paint Shop the tools look pretty much the same. Select the crop tool and drag out a box around the girl, leaving out as much of the background as possible. When you are done, select EDIT>CROP (IMAGE>CROP) The picture ready to crop looks like this:

|
STEP 2
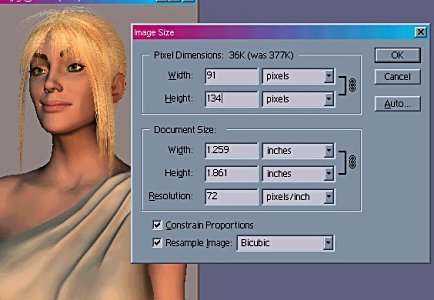
Now that we have the picture *cropped* (all the unwanted junk removed) we have to resize it. Palace only allows avs to be a certain size, and we must stay with those constraints. If you really feel the need to know, you can read the EGE (excessively geeky explanation) below. Otherwise just do it. Select IMAGE>IMAGE SIZE (IMAGE>RESIZE) and look at the magic window. Make sure CONSTRAIN PROPORTIONS (Maintain aspect ratio of...) is selected (believe me, you will regret it if it's not). We will use the *pixel* dimensions. We are going to change them. Look for the one that is BIGGER and change it to 132 (the maximum pixel size in Palace) the other one will change by itself. Yes, it's magic. Then click on *OK* (It's *OK* in PSP, too). OMG, the picture just got VERY tiny. Yep, it did. If it didn't you might be doing something wrong.
WARNING: Excessively geeky explanation: An av is made up of a group of *props*. Props are stored in your *suitcase* in Palace. A prop is allowed to be 44 pixels in each dimension. An av can be as many as 9 props. Its maximum size is therefore 44x3=132 pixels in a square. I use 134 pixels for my largest dimension and it works just fine. You don't HAVE to use all 9 props (in fact *smiley* is just one prop, which is why you can put hats and other things on him, by adding props), but your av will be the *size* of the number of props you use to make it. If you wanted to animate your av you would nest several props on top of each other (another tutorial for another time). The MOST props that can be in an av are 9. That's it. No more. Less is okay, but more is definately out. |
STEP 3
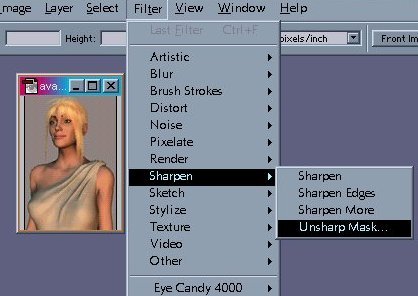
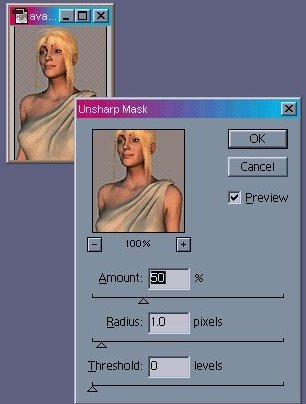
When you make a picture smaller, it tends to get FUZZY. This has to do with Aunty Aliasing or something. I never understood it. (Actually, I do but I want to keep EGE's to a bare minimum). Leave us say it gets fuzzy. But hey, you can fix that. There is a FILTER in both Photoshop and PSP called UNSHARPEN MASK. I could tell you what it does, but I won't. I'll say this though, it makes the picture sharper. Go to FILTER>SHARPEN>UNSHARPEN MASK (EFFECTS>SHARPEN>UNSHARPEN MASK) and click that sucker. a window appears. Most of the numbers here are intensely geeky but the one you need to concern yourself with is % (percentage). Set it to 50 or so. You can play with it if you want. Set it to 200. ACK. Okay, that wasn't a good idea. anywhere from 40-60 works fine for most av art. Once you get your fuzzy picture less fuzzy to your artistic satisfaction, click OK. It looks like this:
|
STEP 4 (Optional)
This is an optional step. We are going to CHANGE the coloring of our pic (called *coloration* amongst av artists). If you don't care to explore this then move on to STEP 5. If you do, kewl, read on.
I don't like her toga, it's the wrong color (or so I think). So I am going to change it. I have the power.
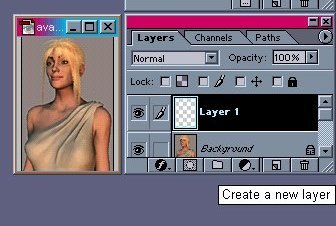
Go to the LAYERS palette and click on CREATE A NEW LAYER. In PSP you have to open the LAYERS box first by clicking the icon on the top. A layer is like a clear sheet of palstic over our picture that we can paint on, or actually do ANYTHING on, but here we are going to paint. Make sure you are working on the LAYER not the BACKGROUND. If you paint on the background it becomes part of the picture forever. If you paint on the layer you can always just delete it if you don't like it. So, paint on the layer. Get a paintbrush from the tool menu and paint ver her toga, I know it looks ugly. We will fix that in a second. Paint CAREFULLY, and JUST on her toga. This is a *stay in the lines* kinda thing. If you get paint where you don't want it you can erase it with the eraser tool. Once you have her toga all painted nice and perdy it should look like this:
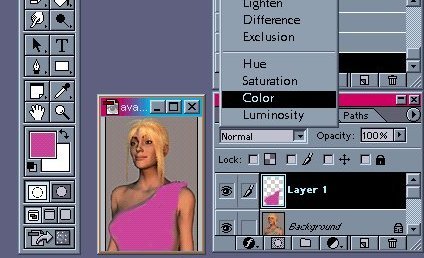
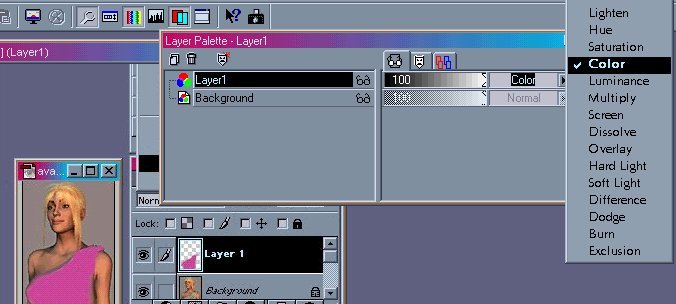
See the MENU I have dropped down? By default in BOTH Photoshop and PSP it will say NORMAL. Who wants to be normal? Not me. I am going to change it. Click on it to reveal a list of options. WOO HOO. You can actually click on any of them (they all do something different), but for this excersize we are going to use COLOR. Click COLOR. Look. The toga turned pink (or whatever color YOU used). and all the detail is still there. Most excellent. And you thought this colorization was some deep dark, secret. Muwah-hahahaha. BTW here's what you'd see in PSP:
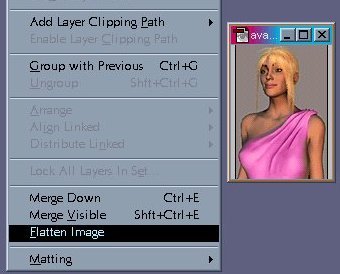
Lastly we have to get rid of our layers. Layers don't work outside of the program (either Photoshop or PSP) and so to save we have to do what is called *flatten* our layers, which means merge them into one picture. This is done under LAYER>FLATTEN IMAGE (LAYERS>MERGE>MERGE ALL). Now we have one layer again, called background and its all of our layers put together. Life is good.
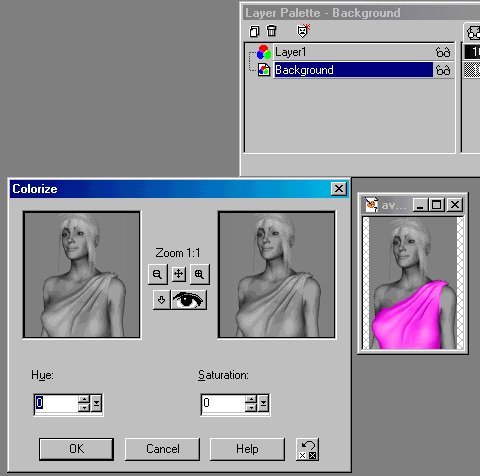
Another common Palace trick is to make the background GREYSCALE (black and white) and paint over it in color. These are sometimes incorrectly called *digitals*. All you do is *desaturate* the original (it's the layer named BACKGROUND in the layers palette Do this BEFORE you FLATTEN (while there are still layers). Here is how that looks in PSP (It looks the same in Photoshop, btw!
|
STEP 5
Ok, now our picture is almost ready. We have to do one last thing, though. It seems Palace has a wierd color scheme, called a Palette, all its own. It's not 256 colors exactly. IMHO it's actually lame, but we won't go there. You get used to it, and after a while you will even be able to work with it. If you DON'T add the Palace Palette to your av, the Palace program does it anyway, and this makes for some rather unexpected results (usually the prop picture turns a shade of green). Best to do it yourself. I think so anyway. Download the palace palette by going to the Palace Planet Download page or click the active links in this tutorial: the files Palace.pal (for PSP) and Palacecolors.act (for Photoshop)
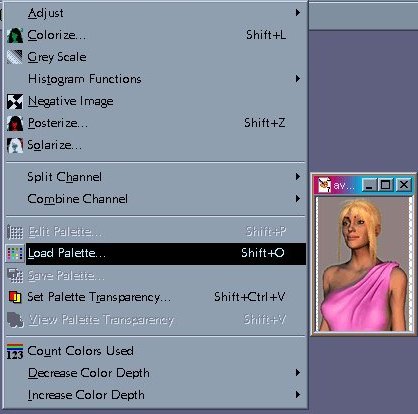
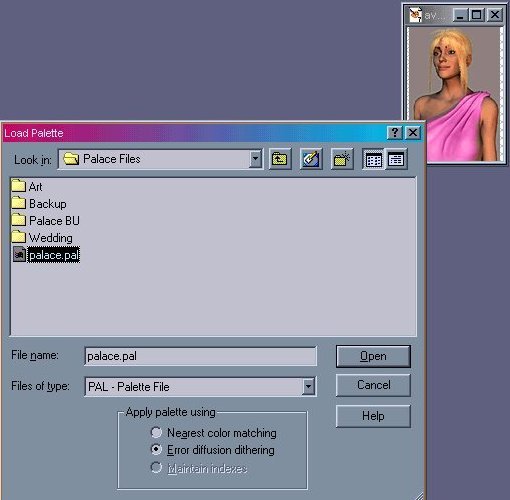
In PSP go to COLORS>LOAD PALETTE and click it. A window opens. Navigate to where you have your copy of the Palace.pal file (it's right where you left it, as I say to my daughter about 100 times a day). Click it to open, and then click OPEN. Simple.
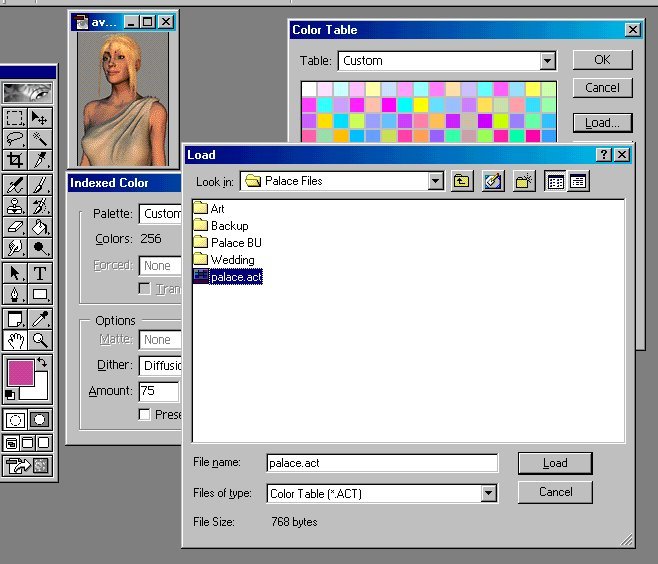
In Photoshop it's not so easy, go to IMAGE>MODE>INDEXED COLOR and click for a window to open. Then from the dropdownlist on the top select CUSTOM and in the next window select LOAD. In the NEXT window navigate to the Palacecolors.act file (once again, it's right where you left it) and click LOAD. Click OK in all the other windows. Once you have loaded the color table it should get added to the list and from then on it's a few less steps.
|
STEP 6
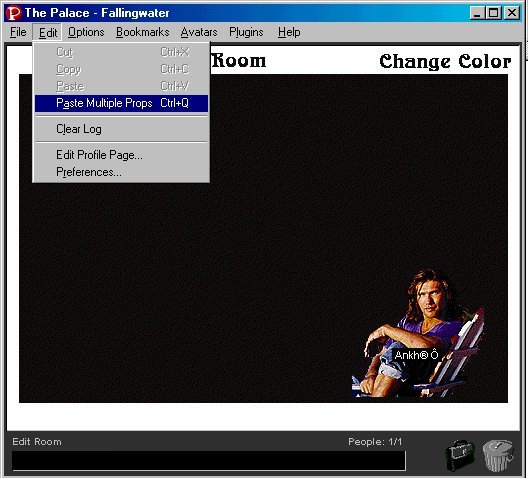
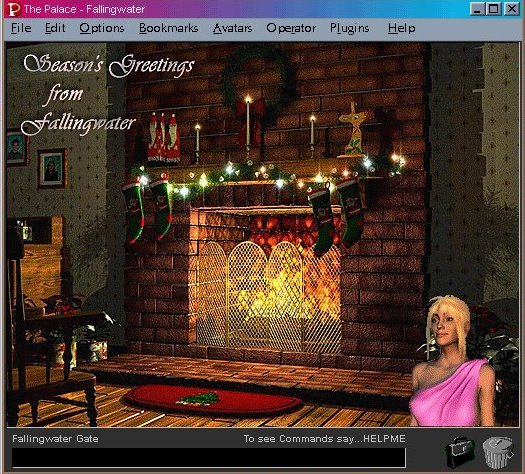
Now, our av is ready for PALACE!! In Photoshop SELECTIONS>SELECT ALL and then EDIT COPY will put your av picture on the clipboard. In PSP you just need to use EDIT>COPY. Then go to your favorite Palace site (I went to Fallingwater at fw.tzo.com:9998). Ask if they have an edit room. Fallingwater does (WOO HOO). Go there. Its a great place to edit avs. They usually have nice single color backgrounds so you can see what you are doing. Once there, go to EDIT>PASTE MULTIPLE PROPS. This will take you av OFF the clipboard, and change it into props, then place these props in your *suitcase*. Your av is now safely in Palace. Open your suitcase (it's in the bottom right corner next to the garbage can) and a window will open showing all of your props. The window looks like this:
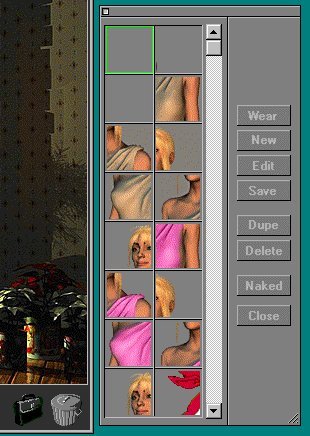
Click on NAKED if you already have an av on and it will go off (remember you can only wear 9 props at a time!!!). Now you can select the props you want to wear and put them on in two ways. One is simply to double-click the prop. The other is to select the prop and click on WEAR. Notice as you put on the props Palace put them all in the right place for you. This is a good thing. Also notice that your av is a square (or rectangle) because of the background. Very ugly. Get rid of that. We do that by a tedious and mundane process known to prop makers everywhere as *editing*. |
STEP 7
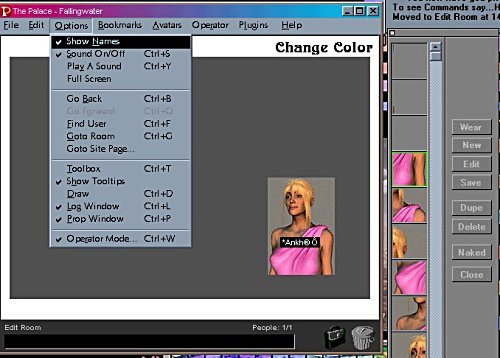
First of all, lose your name tag. It's the black thingy with your name in it. It gets in the way when you are trying to edit an av.To make it disappear go to OPTIONS>SHOW NAMES and turn it off (*deselect* it in geek-a-zoid).
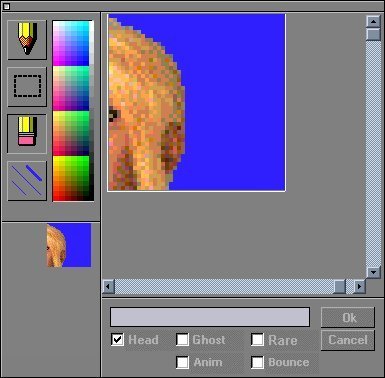
Now click on a prop in your prop window and then select EDIT and this window opens. Cute isn't it? This is where the magic happens. I hate this window. Editing props is no big thing. It's just tedious. Basicly it's a process of REMOVING all the things you DON'T want and leaving what you do. Now, there are as many ways to edit a prop as there are prop editors. This is MY way. I select a color that is bright and easy to see (in this case BRIGHT BLUE) and PAINT in whatever I don't want with the paint brush (the pencil icon). You can change the size of the brush by clicking the bottom icon. You can also FLOOD an area with a color using the ALT key. The *pencil* will change to a paint bucket.
The reason I do this is because you can't SEE all the shades of grey in your prop, and if you MISS any when you put your av on it will have specks of grey (called *fleas* by some artists). Coloring the whole area in first eliminates this problem, since you KNOW you have every pixel you want to erase. You don't have to do this, you can use the eraser (the eraser icon) and simply erase all the things you don't want. If you make a mistake (and you will) use CANCEL to close the window without saving your changes. Then start over.
Once you have got the areas you want removed painted a nice bright color you can FLOOD erase them using the eraser (the eraser icon) and holding down the ALT key. WOW. now your prop is ready to wear. Select HEAD to get rid of the *smiley* and then click OK to save your new prop into your prop bag. Rinse and repeat for each prop in your av. Fun. If your av has 9 props, do this 9 times. Oh, and BTW, common sense dictates that if a prop has NO DETAIL in it at all that adds to the av, you can simple delete it from your prop bag. Be careful, some props have very small but very important details in them., but if you KNOW the prop adds nothing, just get rid of it.
Once you have every prop in your av edited you can put it on and chat away. Kewlness.
|
|
|


